Even as camera phones have taken major strides to make sure that users are able to take the best possible photos with minimum possible intervention, there are occasions we are left with blurry pictures in our photo libraries for various reasons. If you are looking for ways how to fix blurry pictures, you have come to the right place and here will talk about causes behind blurry pictures, a photo repair tool to repair and fix blurry pictures, and what to do to ensure that photos are never blurry.
Part I: Reasons Behind Blurry Pictures
There is a lot that can cause blurry photos, both on the camera side and on the user side. Now, cameras in smartphones come with very fast apertures, so that is usually not the reason behind blurry images. But, there is more to the story. Here are reasons for blurry pictures:
-jerk experienced by phone during tapping or pressing buttons
-subjects moving faster than the speed of photo capture
-improper focus (you focused on something/ someone else away from the actual subject)
And, lastly, while photographing in low light as is the focus of most camera phones today, photos taken under low light require a longer exposure, requiring users to hold the camera still until the sensor is able to take in enough light for a decent exposure.
Even on the latest iPhones this can go into seconds, and this is the perfect way to get blurry photos because whether or not we like it, our hands can move ever so slightly and cause blurry photos especially during those long-exposure shots.
Part II: What Is Wondershare Repairit?
Repairit is not your average photo repair tool – it is a comprehensive solution that helps you repair files, be it audio, video or any other. Needless to say, the software is perfect to fix blurry photos when you need to.
Wondershare Repairit fixes issues with audio-visual media files and other files such as documents quickly and easily. There is an online version you can use can be used to repair videos (limited to 100 MB in size) while the desktop version is the full-fledged version that allows you to repair everything from corrupt videos to documents to photos – fix blurry photos, in this case.
Repairit is your all-in-one repair tool, meaning it is a photo repair tool, video repair tool, audio repair tool and document repair tool rolled into one. This gives you the ability to add any kind of file to the software to repair in one go.
Part III: Use Repairit To Fix Blurry Pictures Quickly And Professionally
One of the most commonly used features of Repairit is as a photo repair tool to repair blurry images. You can use this software to quickly repair blurry images this way:
Step 1: Get Wondershare Repairit from https://repairit.wondershare.com
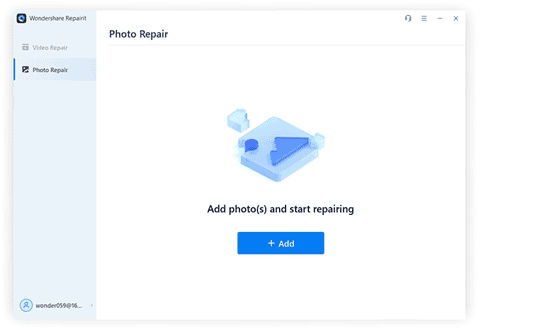
Step 2: The app opens in Video Repair; click Photo Repair to continue:
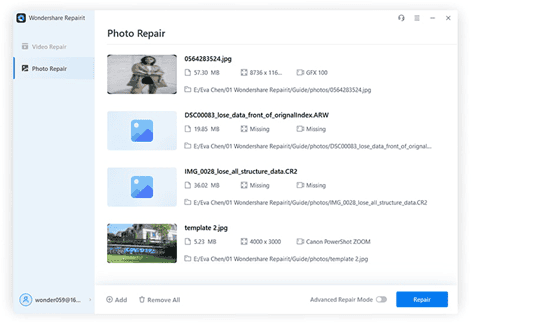
Step 3: Then, proceed to drop your files in the window or click the Add button to add photos:
Step 4: After adding, start the process by clicking Repair
Step 5: A popup notifies you to completion of repair process when Repairit is done repairing blurry images.
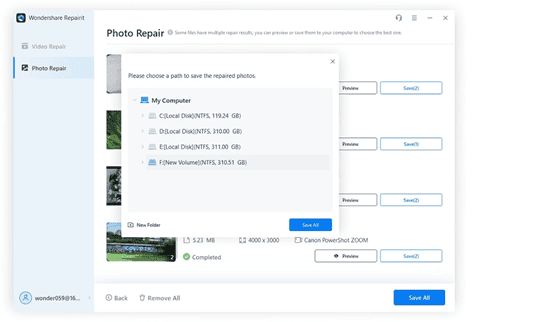
Step 6: You will note Preview and Save buttons beside the photos that you can use to preview the results and save individual files as desired or the Save All button to quickly save all photos at once.
Advanced Photo Repair
Wondershare provides a toggle for Advanced Photo Repair to help you fix the images better in case the original repair has not yielded desired results or if the software was unable to repair the photos added to it.
Part IV: What To Do To Avoid Blurry Pictures
All this work to fix blurry photos begs the question, what to do to avoid taking blurry pictures in the first place? Here is a collection of tips to guide you with taking sharp shots every time you take your camera out for shooting photos.
Tip 1: Camera Stability
While using your phone camera, make sure the hand holding the phone is still, the phone itself is still, and that there are no sudden jerks or movements when pressing the shutter button or tapping the screen.
For professional-grade SLR bodies, make sure the camera is either held securely in both hands or you are using a tripod to balance and stabilize the camera body and lens. In DSLR bodies, you may want to activate image stabilization if your camera body and/ or lens supports it.
Tip 2: Subject Stability
If you are shooting smiling humans for posterity, they do not need to be moving or making sudden movements when taking photos. Ensure that everyone is still before taking the shot. Of course, if you are shooting photos during a game or are shooting birds, this changes things, and you can do nothing about it. Or, can you?
Tip 3: Burst Mode
Modern DSLR bodies as well as camera phones come equipped with Burst Mode for this very purpose – avoiding blurry photos. So, whenever you want to shoot motion, use the burst mode so that the chances of taking a sharp frame are increased. You’d be surprised how you did without it thus far if you have never used this mode before.
Conclusion
Most blurry photos happen because of poor shooting technique by users or when the subject moves abruptly just as the shutter came down. A few blurry photos here and there are inevitable where motion is concerned such as shooting photos at a game or shooting wildlife, but you can use good photo-taking processes to make sure that photos you take are as sharp as possible.
When using a professional-grade camera, a fast aperture helps capture more light in a faster timeframe, allowing for faster shutter speeds. You can increase the ISO to take photos where a high shutter speed is required. But, what to do of those few times we do end up with blurry photos? You can use Wondershare Repairit to quickly fix blurry photos and carry on with your day!


