When you first bought your laptop, it loaded every page with lightning speed, and you stared at that big cinematic screen for hours working, binge-watching the latest series, or playing games.
It gave you that feel-good feeling that you can’t explain, whenever you pulled it out of your bag in public. Unfortunately, every good story always has a bad patch, so as the years rolled by your laptop engine started getting clogged by unnecessary files, bugs, and cache data.
To be honest, nothing is more annoying than a slow laptop that takes forever to load a single window.
However, we’ve carefully compiled a proven list of hacks that will oil your weathering computer engine, so it can run at top speed once again.
You should be able to fix up your laptop whether your running on windows 11, 10, or 8. Now let’s get down to the details.
1. Disable Startup Programs
If your laptop takes an awful lot of time when you hit the power button, then there’s a chance that there are too many programs running during the startup.
This could be system programs, antivirus software, or unnecessary software that runs in the background. Giving your CPU a hell lot of work to do, which will adversely slow down the loading speed.
You can locate and force-stop those unnecessary programs by doing the following:
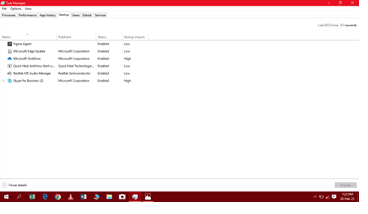
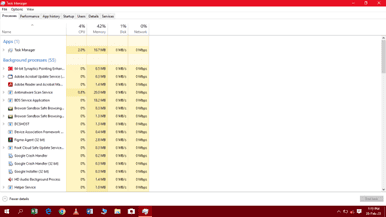
- Go to the Task Bar, then right-click and choose Task Manager or type CTRL+ Shift + Escape
- A window will pop up listing every program running in the background.
- Scan through the list carefully, for programs with high startup impact and are not system software
- Right-click on the program and select disable.
If you’re not sure of the purpose of the software, you can right-click on the application to check the properties or file location.
Alternatively, you can hit the Google search bar for answers, so you don’t end up shooting yourself in the foot. Freeing up your computer’s RAM during startup will give it much-needed room to process files quickly.
Additionally, closing all programs before putting your laptop to sleep is a healthy way of speeding up your system booting process. And that brings us to another big step to turbo charge your computer.
2. Uninstall Unused Apps
At one point or another, you must have installed a long line of applications you barely even use. Some of them are used once in a while and disposed afterward while others are pre-installed programs.
These programs all take up a huge chunk of storage space and take a hit on your CPU performance which could slow down your computer.
Uninstalling or deleting these programs will invariably free up more system resources for optimal performance.
To cut loose unused programs that slow down your CPU you can do the following:
- Hit the Start button
- Launch the Settings application
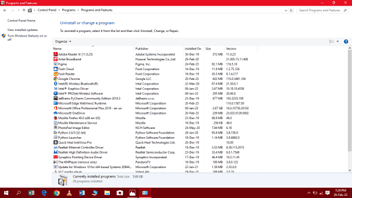
- Navigate to Apps and Select Apps and Features
- Eliminate apps that eat up storage space and system performance.
As a rule of thumb, you should avoid uninstalling any application with Microsoft or Apple as its publisher i.e for both windows and Mac OS.
Also, a tool like PC Decrapfier can come in handy in shedding some light on the importance of each program so you don’t end up uninstalling an important system program.
3. Free up Disk Space
This is the first step that comes to mind when you’re looking to fix up a slow-running laptop. Large files which constitute videos, audio, and games can limit the space used by your processor to ensure a glitch-free performance.
If your storage space hits the red zone i.e 90%-99% full, your computer wouldn’t be able to perform tasks and will lag through every window.
Sometimes we could be guilty of leaving big files like movies that we enjoyed and convinced ourselves to believe that we would re-watch.
An alternative measure would be to move the big files you feel you might need later to an external storage like a flash drive or upload it to a Cloud Storage like Google Drive or Dropbox.
Furthermore, invoking the powers of tools like CCleaner can help crawl through your system drive to dig up hidden files, junk files, cache data, etc.
It can also run scans to show you applications you barely use, this is a hands-free way of managing your files.
Plus, you can bank on a Microsoft disk cleanup program to do the job neatly. To do this follow the steps below:
- Type Disk Cleanup in your windows search bar.
- A dialogue box will pop up with a drop-down menu
- Click on the driver you want to clean up
- Tick all the boxes of files you wish to delete
- Hit the Start button and wait for a few minutes
It’s advisable to keep your storage space within 75% to 80% full to leave enough space for your system RAM to operate efficiently.
4. Check for Malware and Viruses
Nothing quite makes a CPU stutter other than villainous malware and viruses. It’s like a parasite that infects files and programs till it spreads through every software until the computer can barely breathe.
They could come from the internet, software downloads, flash drive, and other hardware. You can tell if your system is under attack if you experience a slow performance, frequent system crashes, slow internet speed, strange loss of disk space, and annoying pop-up ads.
If your computer is already infected there are tools you can use to uproot the malware and get your laptop up to speed. There are many free and paid anti-virus software that can help prevent and eliminate malware attacks.
To keep your system protected, set up regular anti-virus scans for malware, viruses, and system breaches.
5. Update Operating System and Drivers
It’s a best practice to keep your operating system and drivers up to date. Windows or Mac OS will regularly send you software updates which help to beef up system performance and stifle system bugs.
If your laptop is running slow, it can be that your system is operating on an outdated OS and drivers. To update your OS follow the steps below:
- Click on the Start button
- Go to Settings
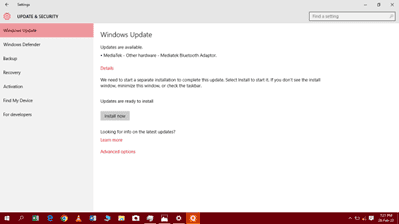
- Select Update and Security
- Check for Windows Update and download if available.
Most of the time, Drivers Update comes packaged in the Windows Update, but if for any reason you wish to manually update your drivers follow the steps below:
- Enter Device Manager in the Windows search box
- Select Device Manager
- Navigate to the device you want to update
- Search for updated driver software and update
If you couldn’t find any driver updates, you can look up your manufacturer’s website and download any updates. Regularly updating your browser and applications can also add much-needed life to your computer and ensure a glitch-free performance.
6. Upgrade Hardware
There are two ways you can upgrade your hardware: upgrading your Hard Drive to an SSD and upgrading your RAM.
Upgrading your Hard Drive to an SSD(Solid State Drive) speeds up your system significantly, making every process a breeze from booting to shutting down. Many laptops come equipped with an SSD while others are running on the much mechanical Hard Drive.
It gives your processor that extra juice to run heavy software, multitask, enhance gaming experience, and load programs faster. Work-from-home nomads will especially find SSD equipped laptops as a lifesaver in terms of speed and efficient workflow.
If you’re using a much older laptop that doesn’t support SSD or don’t want to invest in it you can also improvise with an external drive.
You can install an SSD by visiting a computer repair shop, to perform a surgical operation on your laptop.
Every laptop should be running on a minimum of 8GB RAM to provide enough memory for a buttery smooth performance. Although, some manufacturers are attaching the RAM to the motherboard which makes it impossible to upgrade the RAM.
Basically, more RAM means more game power, more speed, more storage, and more resources to help your system hit cloud nine.
You can upgrade a 4GB RAM to 8GB, 32GB, or 64GB depending on your device specifications. You would need some technical know-how to install a RAM or find a technical professional to get the job done.
7. Disable Animation and Special Effects
Windows animations and special effects create a super realistic, colorful, and immersive interface for optimal user experience. Though on the downside, these animations and special effects take a sizeable amount of system resources and can slow down your processor.
If you can live without the trumpets and whistles of the smooth animations and graphics then it’s about time you hit the big red button.
You can disable animations and special effects by doing the following:
- Go to Control Panel
- Select System and Security
- Click on System
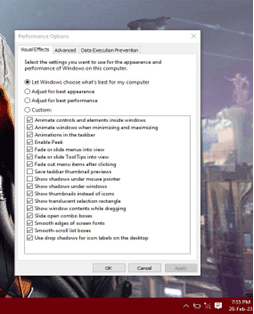
- Locate Advanced system performance and select performance
- Turn off all effects by clicking on Adjust for best performance or individually untick the ones you don’t need
8. Adjust Power Saving
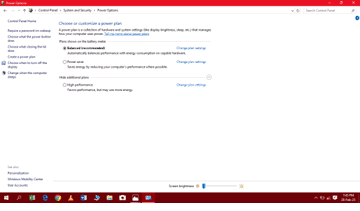
By default, your laptop power settings are perfectly tilted to Balanced(recommended) which simply means you get the best of both worlds in terms of performance and battery life.
If you want to squeeze out some extra juice to speed up your laptop, you will have to adjust the power setting to High Performance but bear in mind that this will take a hit on your battery life.
The other power plan is the Power Saver option, which is only useful when your battery is low because it limits your processor to conserve energy.
To adjust your power setting do the following:
- Go to Control Panel
- Locate Hardware and Sound
- Select Power saver
Choose High performance to boost the speed of your system probably when it’s plugged in and a balanced option when there’s no power. However, someone using a Desktop wouldn’t bother much about Power plans and can subscribe to using the High-Performance setting to boost performance.
9. Defragment the Hard Disk Drive
As you store files in your Hard Disk Drive it gets fragmented or scattered around different memory locations. This slows down your processor because it will take more time for it to organize the fragments of a single file.
And this is where defragmentation comes into play. Defragmentation helps to compile and organize files for easy processing and efficiency.
More recent and advanced Windows updates like windows 11 and Windows 10 have a set schedule for defragmentation but you can choose to do this manually.
It’s worth noting that we defrag only the Hard disk drive because it has a spinning platter disk that scatters the memory of files. But this is a stark contrast to SSD (Solid State Drive) which doesn’t have mechanical parts.
Defragmenting an SSD could lead to more problems so move on to the next step if you’re system is running on an SSD.
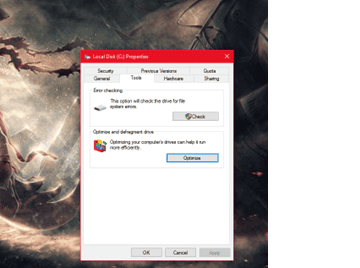
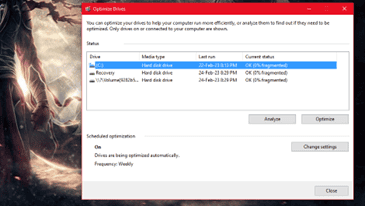
Follow the steps below to defrag your Hard disk
- Locate My Computer
- Right-click the Hard Disk Drive and go to properties
- Move on to Tools and then optimize and defragment the drive
- Choose Analyze to check the level of fragmentation (it should be below 5%)
- Click on Optimize to defrag the Hard Drive
10. Kill Programs Running in the Background
Some programs run in your system background sometimes without your permission and tend to take up space in your RAM resulting in slow performance.
Some of them may be useful like system apps while others are overburdening your processor when not in use. You can use your Task Manager tab to fish out those programs and kill them so they can run only when in use. The Task Manager is just like your personal assistant and will help you monitor every application running in your system including the system resources, memory, and network data used.
It constantly updates in real-time, so it would be best to hang in there a little to sniff out malicious apps and make them fall in line. To access the Task Manager do the following:
- Type in Task Manager on the magnifying glass icon or search box
- Click on Task Manager
- Click on the program and select end task
As said earlier, if you’re not sure of the function of a program you can click on more details or hit the Google search engine for answers.
11. Clear Web Browser Cache Data and Cookies
Have you ever noticed a pop-up that appears when you visit a site for the first time, prompting you to click an “OK” or “Accept” button to save the website cookies? I bet you have.
Also, I believe you’ve launched your browser only to see the previous web page you loaded even without an internet connection. This is because the page has been stored as a cache data.
If your experiencing a slow browsing speed then it might be because of a backlog of cache data and cookies from the sites you visited over time.
Website cookies contain your personal information and browsing history while cache data represents a temporary web page file
These cache data and cookies saved by your browsers can take up disk space and slow down your browsing speed. To delete website cache data and cookies, launch the browsers app > Settings >Clear browsing data > Tick clear cached data and cookies
The process might be quite different depending on your browser, it should be easier to spot in a Chrome browser but you should be able to find it regardless of the browser you use whether Mozilla Firefox or Microsoft Edge.
Suppose your browsing speed is still poor, then you might not look too far away from your browser tabs column. You would want to close down all the tabs to create room for a faster browsing experience.
12. Uninstall Bloatware Apps
Bloatware apps are a bunch of applications preinstalled by your manufacturer. Some of them can be useful while many others occupy disk space and eat up CPU resources.
Your best bet would be to delete them to free up resources for other apps. You can remove bloatware apps by doing the following:
- Hit the Start button
- Go to apps
- Right-click on the bloatware app and uninstall
Although some bloatware apps might not show up in the start menu, then you would need to do the following:
- On Windows 11 or 10 search Add or remove programs
- Scan through the list of applications for bloatware apps
- Right-click on the app and uninstall
13. Use Ready Boost
This is a Windows feature that allows you to back up your RAM with a flash drive. It will be super helpful if you’re running on a smaller memory like 4GB RAM. And can make up for extra memory space for a faster processing power instead of investing in an SSD.
Though it will not turbo charge your system like an SSD but will cover much ground to speed up loading time and accomplish tasks efficiently.
You can activate the Ready boost feature by doing the following:
- Insert your Flash drive into the USB port
- Right-click on the Flash drive and select properties
- Choose to Dedicate this device to ReadyBoost to use the entire storage of the drive or select use this device to allocate the memory size you want to use.
- Click on OK
Next time you plugin in the USB Drive it will automatically be detected as a memory extension for ReadyBoost because it has already been configured.
Conclusion
If you are still stuck with a slow-running laptop then you can try reinstalling your operating system but bear in mind that this action will wipe your system memory. When you reset your laptop it will bring it back to the original state when you first bought it.
It would be best to back up your files with an external storage or cloud storage before doing this.
Though if the problem persists then you would have to invest in a new laptop for crisp performance and efficiency. Here’s a guide to help you choose the best laptops for students, workspace, and gaming.
Felix Bio
Felix is a seasoned tech content writer who helps tech businesses break into new markets and reach a wider audience with high-quality writing solutions that generate leads and converts.
I am a freelance writer for hire and you can check out my writing portfolio and connect with me via my social media handles: LinkedIn and Twitter


